Collar Design
Collars are a new addition to version 2.0 of Garment Designer. You have great flexibility in your choice, and design of the collar you choose to add to a garment.
Collar Groups
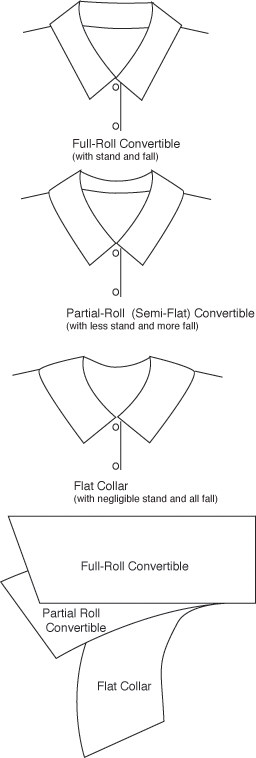
The style of collar is dictated by the shape of the neckline (in comparison to the garment shape), the length and shape of the outer collar edge and the collar width. The illustration here shows you the relationship of three collar styles. Note how the neckline shape varies and the resulting amount of stand and fall (thus roll) that occurs when the collar is attached to the neckline.
The terms associated with how a collar lays on a garment are illustrated below. These are: stand, fold line, break point, neckline edge, style line edge. If you would like to understand the drafting of collars more fully, consider purchasing the booklet called Fun and Fashionable Collars by Susan Lazear (available from Cochenille).
In Garment Designer, there are five collar families that are accessed through the Collar Group Style menu. These are:
- Stand
- Full Roll
- Partial Roll
- Flat
- Hoods
Stand Collars
The Stand collar group will present to you collars that typically only rise or stand. There is no fall. They generally have a straight neckline edge and are rather narrow. They rise upwards from the neck. Styles include band and mandarin variations. The mandarin collars fit closer to the neck (see your manual for illustrations) . The shoulder notch appears in Final Pattern view.
Full-Roll Collars
This collar group features collars that have a rise (stand) and fall. The height distinguishes this style from the Standing collars, in that the collar is tall enough to allow for a folding over or 'roll'. The neck edge is generally straight, but the more tailored styles angle up slightly to contour the neck. Examples of full-roll collars included in Designer are convertible, shirt collars (1 and 2-piece), wing and roll over styles. Most of these collars cannot be joined in the front, as they are designed to work on garments that open in the front. Currently, only the roll-over style can be joined in front.
The shirt collar styles (1-piece and 2-piece) have a 1/2" extension built into the design. If you make your center front top extension greater than 1/2", you will need to adjust the extension on the lower collar piece. Click on the outer curve and drag it outwards until the neck edge extension matches the extension on the front pattern piece.
Partial-Roll Collars
This collar group has a rise (stand) and a fall, which is achieved internally by overlapping of the shoulder seam prior to drafting the collar. If you examine the collar pattern piece on the screen, you will see two grey lines that extend from the shoulder/neck point. These lines are showing you how much overlap was used (at the shoulder seams of the body) to draft the pattern. The lines are there for your reference only and if you alter them, there will be no effect to the pattern. You will see that the collar styles for the Partial Roll and Flat groups are identical to each other in name. However, in comparing the same collar between these style groups, you will see that the neckline shape changes and the outer shape follows suit. The length of the outer edge on a partial-roll collar will be shorter than a flat collar and this is what causes (or forces) the collar to rise more. Thus, partial-roll collars have a greater rise and will sit higher on the neck. Collars that fall into the Partial-Roll group have varying outer shapes and include rounded and squared off outer edges as well as Peter Pan styles.
Flat Collars
These collars lay relatively flat against the body of the garment. There is a very slight rise that is created by a slight overlap of the shoulder seams in the internal drafting of the collar. A slight overlap of the body's shoulder seam (e.g. 1/2") is given to flat collars so that the collar will rise ever so slightly, and cover the neckline seam.
All Flat and Partial-Roll collars can be joined at the front or back. Turn on the Final Pattern option (in the Display menu) to see neckline notches. This helps you understand the collar's position on screen.
Hoods
There are currently three hood styles offered in the program. They each have a slightly different contour as seen on the illustration here. The left hood is the Simple Straight style. The center is the Contoured 1 and the right style is the Contoured 2. The contoured styles offer you curves to further control the shape, should you choose to edit. Note that the neckline shape remains the same. This is modeled after the neckline of the garment.
Hoods cannot be joined at Front, as this simply makes no sense to the style. The contoured hoods should only be displayed in Independent mode (no Join or Adjacent) as the contouring would cross over the centerline, and this cannot work.
Symmetry and Collars
Symmetry exists between corresponding points on the left and right collar pieces. Left/Right Symmetry must be active.
Tailored Collars
Tailored Collar styles are accessed through a new collar group found in the Neck Group style menu. When you choose this option, you will see two new collar styles; Standard Notched 1 and Standard Notched 2. A collar appears automatically in this style, and a 7/8" extension (designed for a 1" button) is automatically added.
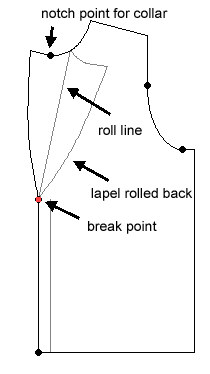
You will see grey lines that represent the center front line and the roll line of the lapel. You will also see a mirrored version of the lapel. If you adjust the outer shape of the lapel, the mirrored version will automatically update and show you how the lapel will now appear on the garment.
The illustration below shows you the labeled parts of a notched collar. When you make adjustments, you may lower the break point and alter the outer lapel shape. Try to avoid altering the neckline shape of the garment as results cannot be guaranteed.
The following is a suggestion for how to create a facing for the tailored notched collars:
- Click on the lower center front edge and add a facing that measures approximately 2-1/2" plus the extension width (in our case 7/8").
- Click on the upper neckline and add a facing that measures 1-3/4"
- Redraw the facing to join the neck facing to the center front facing.
- Create a back facing that measures 1-3/4".
|